Monday, December 28, 2009

Skipping Stones Design Sketch Tuesday # 5

Welcome to week 5 of the Skipping Stones Sketch challenge! This weeks gorgeous sketch was provided by the very talented Kim Teasdale.For this weeks sketch I used the Skipping Stones Design set called Healing Wings. My card is 4" x 6" and has many layers. I stamped the butterfly on Whisper White and clear embossed with my heat gun. I painted the wings with distress inks in peeled paint and spiced marmalade. I think the colors matched the papers just the way I wanted them to.

If you want to participate in this challenge please post your card on Split Coast Stampers keywords ssd01 and skippingstonesdesign and skipping_stones_design ….or send them directly to our email.

On the 1st of January we will be picking a winner from all of the December sketch challenges. The winner will receive 3 Skipping Stones Design stamp sets!!!

Can't wait that long for these awesome stamps? Get free shipping on orders of $30 or more, this includes international orders!

Card Recipe:

Stamps: Skipping Stones Design - Healing Wings
Paper: K&Co, Bazzill.
Ink: Versafine Onyx Black, Versamark, Tim Holtz distress inks
Accessories: Sewing Machine, Cuttlebug and Spellbinders, Sponges, Pop Dots,Clear Embossing Powder

Challenges:

Charisma Cardz - Anything But Christmas

Crafty Creations - No Rules

Lots to Do - Free Theme

If the Shoe Fits - Favorite coloring medium (ink and water!)

Creative Card Crew - Anything Goes

Tuesday, December 22, 2009

Skipping Stones Design Sketch Tuesday!

It's time for another Skipping Stones Sketch Tuesday! The wonderfully talented Kim Teasdale has put together a beautiful sketch for you to try.

If you want to participate in this challenge please post your card on Split Coast Stampers keywords ssd01 and skippingstonesdesign and skipping_stones_design ….or send them directly to our email.

On the 1st of January we will be picking a winner from all of the December sketch challenges. The winner will receive 3 Skipping Stones Design stamp sets!!!

Can't wait that long for these awesome stamps? Use coupon code 25off to receive 25% off your entire order! Plus, get free shipping on orders of $30 or more.

Card Recipe:

Stamps: Skipping Stones Design - Christmas Swirls
Paper: Basic Grey, Bazzill, Stardream opal
Ink: Versafine Onyx Black, Versamark, Tim Holtz distress inks
Accessories: Sewing Machine, Cuttlebug and Spellbinders, Sponges, Pop Dots,Clear Embossing Powder

Challenges:

Stamp with us - Christmas

Creative Card Crew - Anything Goes

Stamp Something - Holiday Somethings

Cupcake Craft Challenge - Celebration

Monday, December 21, 2009

Back with Blog Candy!


Drawing is Closed
Sorry to have been away for so long! I am now back, moved, unpacked and ready to celebrate the holidays! What better way to celebrate than with blog candy!
This great assortment is up for grabs until midnight January 15th. I will draw a winner on the 16th using random.org.

To enter all you have to do is...

1. Leave a comment. Don't forget an email address so I can contact you if you win!

2. Post a picture and a link back to my post on your blog sidebar. (if you don't have a blog you can email a few friends and let them know about the candy)

3. Become a follower if you are not already!

That's it! Super easy and lots of fun.

Only one entry per person please. Any duplicates will be deleted.

Included in the candy are 6 Stamps (Rachel Ann Miller, WOJ, Unity) Over 15 feet of ribbon, Cuttlebug snowflake embossing folder, Rub-ons, Stickers, Prima Flowers, (small and large) Dew drops and tags.

Friday, November 13, 2009

Cheers to you!

This beautiful image is just one of the wonderful new releases over at DZ Doodles this week. Diane has been working her magic and the results are fantastic! You have to go and check out some of her work. There are elves, boxes, bows and of course, this new "Cheers to You".
For this card, I painted the image with Stampin' Up! reinkers and an aquapainter, then popped up one of the glasses for added dimension. Stickles add the sparkle and Crystal Effects add the glassy shine. I used a Fiskars border punch, spellbinders circle, scalloped circle and some grossgrain ribbon to complete the card.

Hop on over to DZ Doodles for your weekly Friday Freebie! This is a great way to build your digi collection, especially if you are new to Digi stamping.
Don't forget! You still have a couple of days left to enter the DZ Doodles color challenge. You could win 2 digi stamps of your choice. I hope to see you there!

I love reading your comments so let me know what you think!


Wednesday, November 11, 2009

Hannah at the Pond

It is time for a new challenge at The Pixie Cottage! Thank you to everyone who participated in our last challenge, I was blown away by all of the beautiful entries.
This week we have a great sketch for you to try and wonderful prizes to by won. I hope all of you will come over to the Pixie Blog and play along.
For my card, I used the Hannah at the Pond stamp by artist Sandra Hammer. Isn't she just beautiful!
After layering my MME dp and Gemstones cardstock, I water colored the image and sponged a sunset sky. I then used my Spellbinders Classic Frame die and popped it up to create a picture-in-a-frame look. I used Distress inks to ink the details and edges. Martha Stewart Pearls and diamond Stickles complete this card.
Here is this weeks sketch, I hope to see you there!

Win these stamps with your entry!!

Challenges:
Whimsy Stamps - Watercolor (the entire image is water colored with SU reinkers.
Allsorts - Bring out your bling -(Embossing powder contains sparkle, flowers have stickles, the gemstones cardstock is full of shimmer and of course, the pearls!)
Simon Says Stamp - thinking of you (Hannah is the perfect all occasion card. She just looks like she is thinking of you doesn't she? :)

Friday, November 6, 2009

Christmas has arrived at The Pixie Cottage

There are two things that I love, Christmas and the Pixie Cottage. So, when I found out that the PC was starting pre-order for their Christmas line, I was so excited! There are so many great images to choose, from Santa, reindeer, penguins, teddy bears...definitely worth taking a look HERE!
I chose this adorable Reindeer image to work with. Isn't he just the cutest! I popped up his huge nose for dimension and then added crystal effects for shine. The holly berries and the red ornaments are embellished with Stickles.
I used the Basic Grey "Wassail" papers and Bazzil cardstock. The background paper was stamped with a flourish, embossed and then embellished with Opaline pearls. The sentiment stamp is by Penny Black.
The snow around Mr. Reindeer is the new Polar White Flower Soft...sigh...I'm in love :)

Let me know what you think and definitely check out the Pixie Cottage Blog to see what the other DT members have done. Their work is gorgeous!Challenges:
Basic Grey - Photo Challenge (I used the colors from the photo and used BG papers and pearls)
Creative Card Crew - Ribbons and Gems (I used sheer green ribbon and pearls)
My time to craft - So many scallops (I used a scalloped circle)
Diva Coffee Break - Color Challenge
Lili of the Valley - 3 Papers, 2 Stamps (1 can be sentiment), 1 Type of Embellishment
Whimsy Stamps - Watercolors ( watercolored my reindeer)

Wednesday, November 4, 2009

Santa Kitty

Diane over at DZ Doodles has just released some fantastic Christmas Digis. I just love this little kitty, there are just so many possibilities with him!
For my card I used Basic Grey Wassail papers and Bazzill Cardstock. I made a frame using the Nestabilities Labels 1 and popped it up with dimensionals. I used two sizes and colors of organza ribbon to add just a little flare. The Corners of the card are from the Cuttlebug Vintage corners set and the detail on top of the ribbon is from the Nestabilities Classic frame set. (I am loving my cuttlebug can't ya tell!)
A simple Basic Grey pearl and some Crystal effects complete the card!
Let me know what you think!

Challenges:
Stamp with Us - Christmas
Creative Card Crew - Ribbons and Gems
ABC Challenge - G is for Green
Creative Inspirations - Red/Black

Monday, November 2, 2009

Spread the Love Blog Hop! A Journal for Jaimie...

If you have arrived here from my talented friend, Trudy Sjolander's blog, WELCOME! I am so pleased you are here!
If not, please go see Katharina Frei to begin this wonderful blog hop!

Thank you for helping us spread some love and awareness and hopefully lots and lots and lots of cards and wishes of hope for this 11 year old girl. Below is a brief bit of info about Jaimie and the tragedy that has changed her life.

Mont Vernon is a small town in New Hampshire. On the night of October 4th Jaimie Cates and her mom went to bed not knowing that events were about to transpire that would change their lives.

Four local teenagers armed with knives, broke into their home and brutally murdered Kim Cates and seriously injured 11 year old Jaimie. They chose the home for no other reason than its location and for no other purpose than to bring harm to the occupants. It was a senseless, random crime that shook the small town and much of the state.

Our hope is that everyone hopping around today will stop for a moment and think about Jaimie and her father and what life must be like for them now. One moment in time has changed their lives forever. We are asking that everyone reading this message please take a moment to make a card and send it off to Jaimie. You can make something very simple or much more involved, but please share some words of hope and love and let her know that people do care and want the best for her. Please send your card to the address below:

Jaimie Cates
c/o Mont Vernon Fire Station
Main Street
Mont Vernon, NH 03057

I hope you enjoyed my creation for Jaimie and that it has inspired you to send one of your own!
Now please go to Deena's blog to continue the hop!

Make sure you go all the way to the end of the hop Stamp Something…for Jaimie
There are lots of prizes to win!

Challenges
Whimsy Stamps - Rounding up love for Jaimie (might be a long shot, but my pearlsand flower are round)
Inky Impressions - Sewing (love to sew on my cards!)
Crafty Cardmakers - Stamp something (used a Victoria Case digi image)
Simon Says Stamp - All that Sparkles (I used tons of sparkle on the flowers and wings)

Wednesday, October 28, 2009

Time to Celebrate a Challenge!

The Pixie Cottage is having their second challenge today! This weeks challenge is a theme, Celebrate. We would love to have you join us!
Hop on over to The Pixie Cottage blog to view the details and see who won last weeks challenge! We had so many beautiful entries, it was so hard to choose our top 3.
The Design team has made some amazing cards for inspiration, so make sure to check out their blogs.

Kristen Kelsey
Andrea T. Seiler
Anne S. F. Lysheim
Kate Tate
Pam Limric
Renata Elenbaas
Risa West
Tammy Maynard
Tara Welch
I used another adorable image from Alisa Ramirez called Pretty in Pink. I stamped her on water color paper and used stampin up ink pads and an aquapainter. I used a pretty pink embossing powder to create the cuffs of her outfit. Prima flowers, MM button, embroidery floss and a Happy Birthday charm complete this card. Remember making friendship bracelets? I used that technique to hang the charm :) Some things never die huh!

Card Recipe
Stamp - The Pixie Cottage Pretty in Pink
Paper - Basic Grey Eskimo Kisses
Cardstock - Core'dinations
Ink - Versafine, Stampin' Up!
Accessories - Prima flower, making memories button, birthday charm from my stash
Challenges
Allsorts - Furry Friends. (She has her teddy!)
One Stop Craft Challenge - Celebrate (It's a birthday!)
Cuttlebug Challenge - Favorite things (LOVE core'dinations cardstock, prima flowers and my watercolors!)
Simon Says Stamp Challenge - All that sparkles! (sparkling embossing powder all over the place!)
Winter Wonderland - Open Theme


Sunday, October 25, 2009

It's a color challenge!

The wonderful gals at DZ Doodles are hosting a color challenge! Our challenge this week is to create a card with Orange and Black. Fitting since it is almost Halloween don't you think? :)
I am so excited to see what everyone comes up with so please come on over to DZ Doodles and see all the guidelines! This does not have to be a Halloween card, in fact, you might challenge yourself NOT to make one. I, however, couldn't resist!
For the challenge, I created a card using the wonderful digi image, Trick-or-Treat Thelma. Isn't she great! I popped up her hat for extra spooky dimension.
The image is colored using Derwent water color pencils and a Dove Blender. I used Stickles on her apron and patches. Spellbinders dies, Cosmo Cricket papers and black brads complete this card!
Like Thelma? Purchase HERE!

Happy Crafting!

Peg

Saturday, October 24, 2009

New Releases and Sugar Plum Fairies!

Today is a new release day over at The Pixie Cottage store! Michelle is going to be revealing some wonderful new winter images just in time for your holiday card making endeavors. I know that you will love the new images, including reindeer, Jolly ol' Santa and much more!
I used this gorgeous fairy from illustrator Alisa Ramirez. I thought she would make the perfect Sugar Plum Fairy for our winter theme today.
I painted her dress, shoes, bow and wings with shimmerz and popped up her cute little head for a 3-D effect.
Hop on over to The Pixie Cottage blog and see the other beautiful cards the Design Team has put together. I know I was inspired!

Don't forget! You still have until midnight EST Sunday, the 25th to submit your card for the first Pixie Cottage Challenge! There are some wonderful prizes up for grabs.

Card Recipe
Stamp - The Pixie Cottage Ballerina Fairy
Paper - Basic Grey Eskimo Kisses
Cardstock - Bazzill and Gemstones
Ink - Versafine, shimmerz paints
Accessories - Sheer ribbon and snowflakes from my stash

Challenges
Basic Grey - Blue, green, red (eskimo kisses paper is blue, green, red)
La-La Land - Sparkle (sparkle in the embossing powder and clothes shimmer)
Whimsy Stamps - Emboss-abilities (image is heat embossed)
The Treehouse - embossing (image is heat embossed)
Our Creative Corner - inspired by your favorite holiday book or movie (Nutcracker!)

Thursday, October 22, 2009

Picture Tutorial using The GIMP


A few months ago I viewed a tutorial on how to enhance your photos using Photoshop Elements. While PSE is a great program, not everyone wants to spend the money to purchase it. Here is where The GIMP comes in handy! The GIMP is a free photo editing software that does almost everything PSE does. However, one of the complaints I have heard about GIMP is that it is not user friendly for beginners. I love using GIMP so I thought I would put together a tutorial for basic photo editing.

To begin, download a copy of The GIMP here.

Photo basics.

Use a sheet or (in my case) a white pillowcase, as your background.
Use natural light from a window whenever possible.
Use the macro setting on your camera (usually a tulip symbol)
Take a couple of shots so that you can choose the best to work with.

Step 1. Take your photo, upload to your computer and open the GIMP program.
(To open your file in GIMP, click on File, select open and choose your photo)


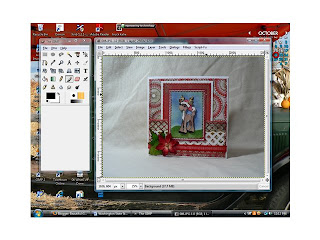
Your window should look like this with the photo and toolbars open.


Step2. Cropping your photo. To crop your photo, choose the crop tool in the toolbox by clicking on it once. (this looks like a knife) Using your cursor, draw a square around your image, leaving a little bit of white on all sides. On
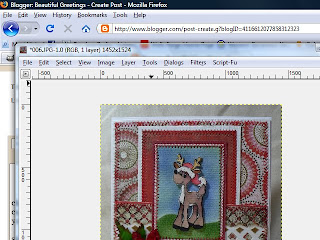
ce you have your square, a box will appear. Click on "crop".


step 3. Now you will have your picture with a transparent background. Select the "Image" tab at the top and select "Fit canvas to layers". This should center your photo and change the background to white.


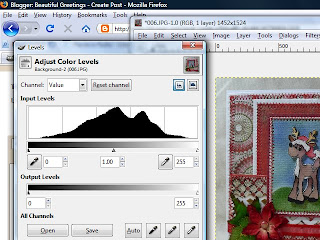
Step 4. Select the "tools" tab and select the "color tools" option. From this option, select "levels". A box should appear with what appears to be black mountains. Under the mountains (for lack of a better term!) there are three arrows. Click on the arrow on the far right and drag to the base of your mountain and release. This will brighten the photo. I usually drag the arrow to the base or just past the base of the black. The arrow on the far left will add more contrast. You can also drag that arrow to see the differences. You can play with this until you get the desired effect. Once you have found the right level for you, select ok.


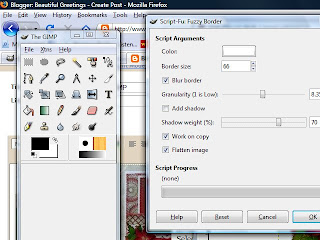
Step 5. Now to add the foggy border everyone loves so much (ok, maybe it is only me!)
Select the tab at the top that says "Script-fu". Under this option select "decor" and choose "fuzzy border". This will open another window with options. There are so many ways to play with your photo here so I will just tell you what I do.
a. Color = White
b. Border size = I usually stay in the 60-70% range.
c. Granularity = Somewhere in the middle (8)
d. Shadow weight = I stay in the 70s
e. make sure your blur border, work on copy nad flatten image boxes are checked and click OK.

Voila! Now you have a bigger, brighter photo with a great fuzzy border. If you don't like the way the border turned out, close the new window and start the script over again.

Step 6. Saving your new photo. Sounds easy enough right! There are a few items that are different in GIMP that I want to walk you through. Click on the "file" tab and select "Save as". Rename your photo and add .jpg at the end of the file. GIMP will not automatically save as a file type. Select the folder you want to save in and click OK. A new window will open and you can select the quality of the photo you want to save. I always choose 100 unless I need a smaller file size.
Now you are done!
Here is my final photo. Can you see the difference?
Don't be afraid to play because you can always delete.

Next week I will go over how to add your watermark!
If you have any questions at all, please don't hesitate to leave a comment.

Sunday, October 18, 2009

Whiff of Joy and Heated Pearls

I love trying out new techniques, even if most of them don't turn out that great the first time. (don't tell anyone!)
Today I tried out the technique called heated pearls. You can find the tutorial on SCS.
To create this effect, all you need is Pearl ex (preferably more than one color) Elmers glue, a stipple brush and a heat gun!
I used the technique on the top of Willows umbrella to create a wet look. Like I said, not perfect but enough to make me happy :)
1. I stamped the umbrella on glossy cardstock and then heat embossed with clear embossing powder.
2. I dabbed small dots of elmers school glue all over the umbrella.
3. I sprinkled two colors of pearl ex lightly over the glue. (doesn't have to be perfect, just sprinkle away!
4. I used a stipple brush to blend the glue and the pearl ex all over the umbrella.
5. Heat with your gun until it starts to bubble!

Some tips that I learned the hard way!
1. Cut your image out before you go to step two. Otherwise, once you have heated your image, you can no longer see the lines you need to cut on!

Other than that it was a lot of fun to try! If you decide to try it, post a link to your card, I would love to see it!

The Stamp used here can be purchased at Michelle's Scrapbooking and More!

Challenges:
Whiff of Joy - Use a die cut - I used Spellbinders circle Nesties!
Whimsy Stamps - Get Punchy - I used a spellbinders circle die
Stamp Something - Bling It - I used sparkly embossing powder of of course my shimmery umbrella!
Everybody Art - Shapes and punches - I used a spellbinders circle die
Paper Play - Favorite Embellishment - I LOVE using ribbon on everything

Saturday, October 17, 2009

Poinsettia's And Pearls

You know what I love most about Christmas cards? Feeling like there can never be too much bling on them! I loaded this baby up with silver sparkled ribbon, silver embossing powder, half pearls and beaded snowflakes!
This poinsettia is a new digi image from DZ Doodles. I printed it out 3 times and layered it for dimension. A versamark pen and some silver embossing powder added the sparkle and copics added the color! I still deem myself a Copic flunkie because I used 3 different colors and you can't even tell! LOL...I will leave the copics to the pros.
I used the Spellbinders square Nesties and one of the tags from the Fancy Tags collection. Each layer was stitched with my sewing machine, using Madeira rayon thread.
I used Bazzil cardstock and both Basic Grey and Making Memories DP.
I love your comments so let me know what you think!

Challenges:
Allsorts - Monochrome Christmas Sketch Challenge - I used the sketch and my color is blue!
Whimsy Stamps - Get Punchy - I used two spellbinders die cuts
Stamp Something - Bling It - I used a whole lotta bling!
Everybody Art - Shapes and punches - I used die cuts
Paper Play - Favorite Embellishment - I LOVE using ribbon on everything

Wednesday, October 14, 2009

Come Play with the Pixies!

Come join us over at The Pixie Cottage to get details on our brand new Wednesday Challenge. Every other Wednesday we will offer a new sketch and new prizes so mark your calendars and check back often!
Michelle has offered up some amazing prizes so it is sure to be a great time for all.
Make sure to browse all the of wonderful Design Team creations to get the mojo flowing.
Here is this weeks sketch


Saturday, October 10, 2009

New Releases at The Pixie Cottage!

Fall is in the air over at The Pixie Cottage! Michelle is releasing some new stamps today and they are gorgeous! I had great fun playing with Hannah dressed in her witchy best! Isn't she just the sweetest witch you have ever seen?
Pixie Cottage stamps are adorable, high quality rubber. You can pick up your very own Hannah at Michelles Scrapbooking and More!

Don't forget to take a look at the Design teams gorgeous creations!

I also entered this card into the Simon Says Stamp Challenge!

Fabulous new releases over at DZ Doodles!

Today is Saturday and that means another fantastic release over at DZ Doodles. Diane has been doodling overtime and has some gorgeous new images for you to check out over on her website.
I felt festive and decided to play with the Cardinal. I just love the color and the festiveness (is that a word) :) of those beautiful birds.
Please take a few moments and check out all of the cardmaking possibilities at DZ Doodles.
You can buy this cardinal and check out the rest of the new releases HERE!

Don't forget to check out the rest of the teams fabulous creations!

Kim Burmeister - Clearly Inspired

Corine Lambert - SCRAPCOCO

Christy Dillman - Christi's Zaney Creations

Kristi Ketterlin - Kuttin Kards

Tammy Maynard - Life....Enjoy It!

Valerie Urtiaga - Pixie Dream Designs

Rosalien Zwackhalen - CARDFUN

Heather Huggins - Hopefully Heather's Stuff

Rebecca Barlow - The Paper Bug

Barbara Walker - The Buzz

Barb Staradumsky - Scrapworld - Scrap2day


Wednesday, October 7, 2009

October is Breast Cancer Awareness month!

To celebrate the month and to raise awareness for Breast Cancer, my friend and talented artist, Wendy Hall designed this digital image. Isn't she gorgeous! The best part is that you can get your own Pink Ribbon Maggie over at Wendys website Digital Delights, absolutely free!
I'm sure we all know or know of someone who has been affected by this horrible disease. Lets all go grab a Pink Ribbon Maggie and spread the word about Breast Cancer Awareness month! I would love to see what you make!

Sunday, October 4, 2009

Autumn Blooms

I spent my WCMD inking up my new Heartfelt Creations stamp. I am just loving flowers lately and thought that this would be perfect to do in fall colors (my favorite time of the year!)
I used Bazzil cardstock as my base and added some K&Company DP in oranges, greans and browns. I used my Spellbinders Fleur-de-lis pendant as a decorative element.
The image is watecolored using stamp pads and an aquapainter. I popped up some of the leaves, berries and the flower for dimension and added crystal effects to the berries and the flower for that shine I love so much :)
Let me know what you think!

Saturday, October 3, 2009

World Card Making Day and a Sneak Peek from the Pixie Cottage!

Today is world card making day so get out the paper and glue and craft something beautiful for someone special!
World Card Making day celebrates creativity and connects fellow card makers. This event recognizes the power of handcrafted goodness, and the empowering nature of creativity.
The design team at Pixie Cottage is celebrating this event by offering sneak peeks of the magical world that Pixie Cottage has to offer. Join in the fun and see if you too can find your creative magic!

To celebrate the day I made a car using the Fall Wagon wheel stamp. The stamp reminded me of taking me kids to the pumpkin patch on a beautiful fall evening.
The image is colored using watercolor pencils and an aquapainter. I used spellbinders to create the decorative elements in the card and Martha Stewart pearls for the corners. Crystal effects and stickles make the image shine!
For more inspiration and to see more stamps being released by Pixie Cottage, check out these blogs!

All of these stamps and many more can be purchased from Michelles!

Thursday, October 1, 2009

Cup full of Birthday Wishes!

Here is another fun image from Diane at DZ Doodles! This is called the Cupcake Coffee Cup and can be purchased HERE.
For this card I created a frame for my image using two different sizes of the Spellbinders Nestabilities. My image is watercolored using Stampin' UP! Inks and an aquapainter and then popped up with dimensionals. I dug out some of my Prima flowers and jeweled brads to complete this card.
Chocolate and teal is one of my favorite color combinations!

Card Recipe:

ALL STAMPS USED: Cupcake Coffee Cup by DZ Doodles
CARDSTOCK AND PAPERS: Bazzill and Basic Grey
INK: Stampin' UP and Versafine
MARKERS (if any): None
ACCESS. AND EMBELLISHMENTS: Crystal Effects, stickles, nestabilities, prima flowers, brads, Madeira thread
COLORING MEDIUM (if any):Distress inks and an aquapainter.
SPECIAL TECHNIQUES (if any): Paper tole

Tuesday, September 29, 2009

Christmas is in the air!

I saw this adorable image from DZ Doodles and just had to make another Christmas card...hey, you can never start your Christmas cards too early right!
This cute little guy can be your for FREE! Just go to the DZ Doodles group on Papercraft planet and join! There is a link in discussions that will allow you to get a freebie each week! Now that is generous! Come join us and chat or share your work. We would just love to see you.

Card Recipe:

ALL STAMPS USED: Reindeer by DZ Doodles
CARDSTOCK AND PAPERS: Bazzil cardstock, Basic Grey DP
INK: Versafine, stampin up!
MARKERS (if any): None
ACCESS. AND EMBELLISHMENTS: puffy velvet, prima flowers, Madeira thread
COLORING MEDIUM (if any): Stampin up ink pads and aquapainter
SPECIAL TECHNIQUES (if any): Paper tole

Monday, September 28, 2009

Exciting News!


The announcement has been posted so I can finally tell you all the good news!

I HAVE BEEN SELECTED TO BE ON THE PIXIE COTTAGE DESIGN TEAM!
I absolutely adore the images over at Pixie Cottage and can't wait to ink up those images!
Thank you Michelle for the opportunity!
You can check out Michelles store and the Pixie Cottage line
HERE!

Friday, September 25, 2009

Antique Rose

I received this stamp from Heartfelt Creations and couldn't wait to ink it up! I am really happy with how it turned out. I used Bazzil cardstock, K&Company DP and the Spellbinders spades pendant for the decor. A simple satin ribbon completes this card.
The rose image was stamped using Stampin Up Old Olive and again with versafine black. I used Tim Holtz distress inks and copics for color.
Let me know what you think!

Winner of the DZ Doodles Ornament!


True Random Number Generator

3

Congratulations Denise! Email me and let me know which email address you would like your digi sent to!


Sunday, September 20, 2009

Another New Release from DZ Doodles! Win this Image!

Can you believe it, Christmas is drawing near and it is time to start thinking about what image we are going to put on our cards this year. This new image from DZ Doodles is sweet and simple. The possibilities are endless with this image.
For my card I printed the image twice and cut one out, chopping off the ball of the ornament and leaving space for my sentiment. I then stamped my sentiment with Versafine black ink and dipped it in a sparkling embossing powder. Once heat set, it really shimmered. This is a rubber stamp from Penny Black Inc.
For my green background, I dry embossed the paper using a Cuttlebug embossing folder. I inked the raised portion with Versamark and coated it in the same glittered embossing powder. What can I say, I LOVE a lot of sparkle at Christmas!
I then cut out the ornament part of my second image and traced it onto DP. Once cut out, I inked the edges with distress inks and glued it to the original piece of cardstock. I popped up the ornament with dimensionals and...voila...a beautiful Christmas ornament!

Do you want to try out this ornament? Leave a comment here and I will draw a name on Friday, September 25th!

Saturday, September 19, 2009

More new releases from DZ Doodles!

Today is a beautiful day! The sun is shining and there are tons of new releases to see at DZ Doodles! Diane has doodled up some wonderful new images and I can't wait to get my hands on them. For a sample of what she has, I made this card with the new Squirrel stamp. Can't you just feel fall in the air and see those cute little guys gathering for the winter?
Go on over to the shop and check out whats new!

Monday, September 14, 2009

Winner of the DZ Doodles Image is...


Tina Janiga who said, "OOO OOO OOO pick me, pick me. Although it will be tough picking the one I would want, they are all great!!! Thanks for the chance!!

True Random Number Generator
4

Congratulations Tina! Email me with your choice and I will get that right to you!

Saturday, September 12, 2009

DZ Doodles New Release Today!

Come on over to DZ Doodles to see their fantastic new releases! The apple basket above is just one of the wonderful new Digital stamps that are being released today.

To make things really exciting, post a comment on this post before midnight PST Sunday to win your choice of one of the new releases!!

For the card above I colored the apples using Derwent watercolor pencils and a Dove blender. The front apple has been popped up for dimension and all the apples have been glazed with Crystal Effects for shine.
The stitching was done using Madeira rayon threads in gold.

Card Recipe:

ALL STAMPS USED: Basket of Apples by DZ Doodles
CARDSTOCK AND PAPERS: DCWV cardstock, K&Company DP
INK: Stampin' UP
MARKERS (if any): None
ACCESS. AND EMBELLISHMENTS: Crystal Effects, stickles, Madeira thread
COLORING MEDIUM (if any): Derwent watecolor pencils and Dove Blender
SPECIAL TECHNIQUES (if any): Paper tole

Monday, September 7, 2009

Fall is in the air!

I am such a fall person. Give me a slight chill and colorful leaves any day. I have to say that HOT 90 degree days are not for me. I often tease my husband that I should be living in Alaska!
So, since today was a chilly, fall like day, I am inspired to create.
I used this adorable digi from DZ Doodles. This scarecrow can be obtained for FREE over at the Copic Buzz challenge. Nope, you don't have to use Copic markers to participate, any medium will do.
I sponged my background and attempted to use Copic markers on my scarecrow. I say attempted because I went back and shaded a little with my Prismas...I couldn't help myself! Once colored I popped his clothes up for dimension and added Crystal effects to his face. Since I cannot seem to create a card without a little sparkle, I added some Stickles to his patches...he is one stylin scarecrow! :)
Enjoy and be sure to leave me a comment! I love to read them all. If you enter over at Copic Buzz let me know so I can go and check out your work!

Card Recipe:

ALL STAMPS USED: Scarecrow by DZ Doodles
CARDSTOCK AND PAPERS: DCWV cardstock, Making Memories DP
INK: Stampin' UP
MARKERS (if any): Copics
ACCESS. AND EMBELLISHMENTS: MM brads, Cuttlebug embossing folders, satin ribbon, crystal effects, stickles, nestabilities
COLORING MEDIUM (if any): Copic Markers and Prisma pencils
SPECIAL TECHNIQUES (if any): Paper tole

Sunday, September 6, 2009

Free Digi from DZ Doodles!

Do you like Jack with Cat? If so, come on over to DZ Doodles and get him for FREE! For a limited time Diane is offering this adorable digi for free. Just go to the Halloween section, select the image and check out. It is that easy. Don't forget to share your work with us! We would love to see it and add it to our gallery!

Tuesday, September 1, 2009

DZ Doodles and the Doodles Dozen!


Hi Everyone! I wanted to share some really exciting news with you. DZ Doodles announced their first design team and I was lucky enough to be picked! They are calling it the Doodles dozen.
They are hosting their first challenge at Copic Buzz today! Come over and play for a chance to win some great prizes. The details can be found on their blog Copic Buzz!
Come take a look at these wonderful Digi Stamps designed by Diane Zyla. You can purchase any of these wonderful stamps at DZ Doodles.
For my first DT card I used the Cornicopia stamp found HERE.
Let me know what you think! I love to read all of your comments, they really make my day.

Card Recipe:

ALL STAMPS USED: Cornicopia by DZ Doodles
CARDSTOCK AND PAPERS: DCWV, Bazzill dots, Bo Bunny DP
INK: Stampin' UP
MARKERS (if any): None
ACCESS. AND EMBELLISHMENTS: Basic Grey pearls, Cuttlebug embossing folders, satin ribbon, crystal effects
COLORING MEDIUM (if any): Stampin' UP! ink pads and aquapainter
SPECIAL TECHNIQUES (if any): Watercolor and paper tole.

Pixie Cottage stamp line!

Hello again! Michelle at Michelle's Scrapbooking has started her own stamp company - The Pixie Cottage. These stamps are absolutely adorable. I love stamps that are a little on the whimsical side! :)
She is holding a design team call and I have decided to submit an application!
If you are interested go to The Pixie Cottage Design Team Call and follow the instructions!

One of the requirements are to post 3 of your recent projects and link back to the DT call post.

The projects I am submitting from the last 2 weeks are:I wish everyone that submits an application the best of luck!
Blog Widget by LinkWithin